Pasang iklan Anda di sini.
https://goo.gl/Io3Xqy

Jumaat, Mac 29, 2013

0 Add Facebook Alike Twitter Fan Box To Your Blog


I had already posted on adding Twitter Follow Button to your blog, but Today in this post i am going to show you to add Twitter fan box to your blog which looks similar to Facebook Like Box. This is an third pary widget or application devloped by Mark Carey. This widget can help you to achieve more twitter followers and eventually results in greater traffic from twitter. This twitter fan box shows images or avatar of top 10 newest followers on you twitter account. This widget will let your blog visitors to easily follow you on twitter from within your blog. So lets add this great widget to your blog or website.

How To Add ?
  • Go to blogger Dashboard and select Layout.
  • Then click on Add Gadget and select Html/Javascript
  • Now paste the code given below in it.
<script type="text/javascript"
src="http://s.moopz.com/fanbox_init.js"></script><div
id="twitterfanbox"></div><script
type="text/javascript">fanbox_init("www.doyshinja.com");</script> 

  • Make sure to replace www.doyshinja.com with your twitter username.
  • Save the widget and you are done.


0 Play Youtube Videos Inside VLC Media Player


Hello friends today i got a awesome trick to play YouTube videos inside the VLC player. And i know you all get excited to know this tricks.


We all know that VLC Media Player is world's most popular media player which play every video format easily.And the good news is that now you can also play YouTube videos's with that.

How To Play:-

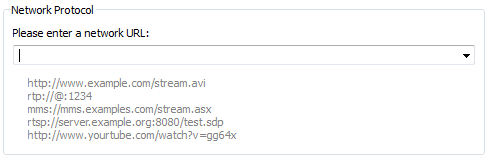
It is so simple trick just open your VLC player and press CTRL+N to open the network url dialog box as shown below.

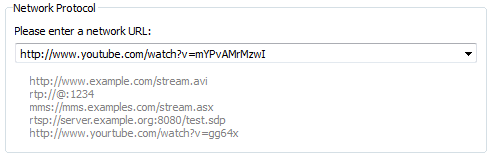
Now paste the You tube videos url inside it as shown below i add the Gangnam Style video url here as shown below.

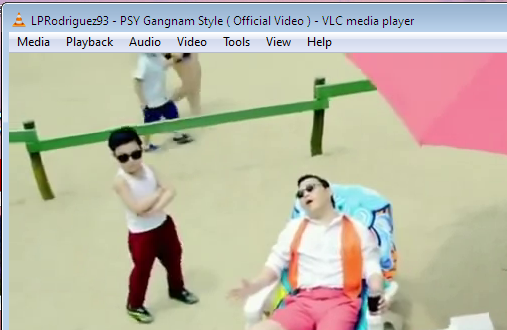
 And then click on the play tab and video is played.As shown below.


Benefits Of Playing You tube Videos Inside VLC Player:

(1) The most beneficent features of playing You tube videos inside VLC is that VLC plays no ads inside the video.

(2) Take snapshot option to capture a screenshot.

(3) Change the playback speed.

Also there are some great benefits of playing You tube videos inside the VLC player.


0 How To Automatically Close Private Browsing Session In Firefox


Hello Friends if you are one of those persons who browse private surface in public settings, such as your office then there might be times when you would have to leave your desk while having the private browsing session open. In this article we will explain how to automatically close private browsing session in Firefox after a certain inactivity period.

How to Automatically Close Private Browsing Session In Firefox After A Certain Inactivity Period:
Firefox now has a new extension called PB Exit. PB Exit just closes your private browsing windows on Firefox automatically after 10 minutes of inactivity i.e. after 10 minutes have passed since the last page load or tab switch.

PB Exit is one of the simplest Firefox extensions. After you have it installed, it would just run in the background and will close private browsing tabs after 10 minutes of inactivity. Currently PB Exit does not have any settings, but the developer has made a note in the extension’s description that he may allow users the ability to set customer idle time in the future.

Selasa, Mac 26, 2013

0 Add Facebook Posts Recommendation Bar To Blogger

Facebook recommendations bar is one of the best widget i would recommend for all bloggers, if you are truly concerned about your site pageviews and bounce rate, because it will force readers to stay longer on your blog by engaging them with more posts. It's designed to collapse on page load and expand displaying additional recommended articles right after readers have reached a particular point while scrolling down. It contain a like button and also display only your blog posts that are previously liked or shared on Facebook


Create Facebook App ID


The first step is to create a Facebook application so as to get a AppID which you are going to include in the recommendation bar code.
  • Go to Facebook developer page
  • If you have created an application on facebook before, then click on +Create New App, and a pop-up window will appear, but if you have never create an App before, then you will notice the pop-up window automatically.
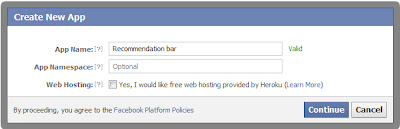
  • Now type Recommendation bar inside the App Name field and click on the Continue button.
  • Enter the captcha security code and click on Submit.
  • Now click on Website with Facebook Login tab and enter your site url including a slash at the end and leave the remaining options and click Save Changes as shown below.
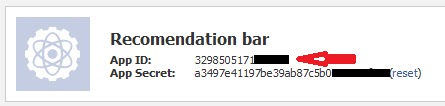
  • Your App ID is now ready. copy it from the top of the page as shown in the screenshot below.


Now let's move to, how to implement it on blogger.

How To Implement It On Blogger


  • Go to your dashboard
  • Click on Template > Edit HTML > Proceed (Mark/Tick Expand Widget Templates)
  • Use ctrl F to find <html and replace it with the following code.
<html xmlns:fb='http://ogp.me/ns/fb#'
 This will make the plugin compatible in older versions of  internet explorer also. but you can also skip it.

  • Search for </body> and paste the following code above/before </body>
<div id='fb-root'/>
<script>
//Facebook Recommendation bar tutorial by www.realcombiz.com
//<![CDATA[
(function(d, s, id) {
  var js, fjs = d.getElementsByTagName(s)[0];
  if (d.getElementById(id)) return;
  js = d.createElement(s); js.id = id;
  js.src = "//connect.facebook.net/en_US/all.js#xfbml=1&appId=Your-App-ID";
  fjs.parentNode.insertBefore(js, fjs);
}(document, 'script', 'facebook-jssdk'));
//]]>
</script>

  • Replace Your-App-ID with the Facebook App ID you copied in first step.
Next

  • Search for </head> and paste the following code above/before </head>
<b:if cond='data:blog.pageType == &quot;item&quot;'>
<meta content='article' property='og:type'/>
<meta expr:content='data:blog.title' property='og:site_name'/>
<meta expr:content='data:blog.pageName' property='og:title'/>
<b:if cond='data:blog.postImageThumbnailUrl'>
<meta expr:content='data:blog.postImageThumbnailUrl' property='og:image'/>
</b:if>
<b:else/>
<meta expr:content='data:blog.title' property='og:title'/>
<meta content='website' property='og:type'/>
</b:if>

<meta expr:content='&quot;en_US&quot;' property='og:locale'/>
<meta expr:content='data:blog.canonicalUrl' property='og:url'/>

  • Now lastly, find <data:post.body/> and paste the following code after/below it.
<b:if cond='data:blog.pageType == &quot;item&quot;'><b:if cond='data:blog.pageType != &quot;static_page&quot;'><div style='z-index:999999; position:absolute;'>
<fb:recommendations-bar action='like' max_age='0' num_recommendations='3' read_time='10' side='right' site='http://www.doyshinja.com' trigger='40%'/></div>
</b:if></b:if>

  • num_recommendations: this represent the number of posts to be displayed, you can adjust it by editing 3.
  • side: the widget will float to the right by default, to relocate it to the left, simply change right to left.
  • trigger: the widget will expand as soon as the reader scroll down to 40% of your blog.
  • Replace http://www.doyshinja.com with your blog url.
  • Now finally Save your template.
We just include the widget on this blog, so we hope you implement it on your blog too in other to engage readers more. If you think this widget help a bit, take few seconds to share it and we also love to hear your insight about this widget.

WARNING! Jika Anda Ingin Copy Paste Silahkan Sertakan Sumber nya, atau Jika Ingin Share Artikel nya Silahkan Sertakan Credit nya . Terima Kasih ;D